

Every time a visitor lands on an un-cached WordPress site, your server is forced to run the exact same expensive routine: wake up PHP, execute 30 to 70 MySQL database queries, assemble theme templates and generate the HTML document from scratch. When 20 people hit your site at once, CPU usage spikes toward 100% and your Time to First Byte (TTFB) shoots past two seconds.
If your website runs without a WordPress cache plugin, your server performs repetitive computational work on every single page view. Your web host quickly runs low on memory and your pages grind to a crawl.
Installing and configuring a WordPress cache plugin solves that bottleneck. Instead of rebuilding your pages on every click, a WordPress cache plugin saves a static HTML snapshot of each page on the server disk or in memory. When the next visitor arrives, your server sends that pre-built HTML file in milliseconds without touching PHP or database tables.
In this guide, I will show you how a WordPress cache plugin works under the hood, how to set up your caching rules step-by-step and how to troubleshoot common caching glitches like a seasoned web engineer.
Quick Answer: What Does a WordPress Cache Plugin Do?
- Eliminates dynamic server load by converting PHP execution into static HTML files. This cuts server CPU usage by up to 90%.
- Accelerates server response times. A configured WordPress cache plugin drops your Time to First Byte (TTFB) from over 1,500ms down to 50ms to 150ms.
- Optimizes Google Core Web Vitals. Modern caching tools delay non-critical JavaScript and optimize stylesheets so your site passes Largest Contentful Paint (LCP) and Interaction to Next Paint (INP).
- Protects your hosting server during traffic spikes. A solid WordPress cache plugin lets a modest cloud VPS or shared hosting plan handle thousands of concurrent visits without crashing.
Why Caching Matters: Verified Statistical Data and Business Impact
Before looking at the technical mechanics of a WordPress cache plugin, let us examine why web performance directly influences your website growth and revenue. Speed is not just a vanity metric. It directly determines whether visitors stay on your site, read your content or buy your products.
Independent research from Google, Deloitte and leading web testing agencies reveals that deploying an effective WordPress cache plugin delivers significant commercial benefits across four core areas:
1. Faster Page Speed Directly Elevates Conversion Rates
Every millisecond of latency you remove from your website makes visitors more likely to complete purchases, subscribe to newsletters or submit lead forms.
- The 0.1-Second Revenue Increase: In a benchmark study conducted by Deloitte Digital and Google, improving mobile page load times by just 0.1 seconds increased retail ecommerce conversion rates by 8.4%, boosted travel booking conversions by 10.1% and raised average order values (AOV) by 9.2%.
- The 1-Second vs 5-Second Conversion Cliff: Research from Portent demonstrates that websites loading in 1 second convert at a rate three times higher than sites taking 5 seconds. Every additional second of delay between 0 and 5 seconds reduces overall conversion rates by an average of 4.42%.
2. Slashes Mobile Bounce Rates Significantly
Mobile visitors browse on variable wireless connections and have little patience for slow web pages. When static caching delivers instant pages, mobile visitors stay on your site instead of bouncing back to search results.
- Google Mobile Bounce Probabilities: Official performance research published on Think with Google indicates that as page load times stretch from 1 second to 3 seconds, visitor bounce rates increase by 32%. When load times reach 5 seconds, bounce rates surge by 90%.
- The 3-Second Mobile Threshold: Over 53% of mobile visits are abandoned completely if a webpage takes longer than 3 seconds to render visible content.
3. Helps You Pass Google Core Web Vitals and Boosts SEO Rankings
Google uses Core Web Vitals as official search ranking factors. Slow server responses and unoptimized code directly hurt your search visibility.
- Time to First Byte (TTFB) Acceleration: Google’s web.dev TTFB guidelines require server response times under 800 milliseconds for a “Good” rating. An un-cached WordPress installation often suffers from TTFBs exceeding 1,800ms due to database queues, while a reliable caching tool drops TTFB down to 50ms to 150ms.
- Main Thread Script Optimization: Modern caching plugins delay non-critical JavaScript execution until visitors interact with the page. That keeps the browser main thread free and delivers excellent Interaction to Next Paint (INP) scores.
4. Reduces Server CPU and Database Load by up to 90%
When you configure a WordPress cache plugin properly, your server stops running redundant PHP scripts for repeat visitors. This preserves server capacity for business-critical requests like WooCommerce checkouts and member logins.
- Fewer Concurrent PHP Workers: Standard shared hosting plans provide only 2 to 5 PHP workers. A spike of 20 un-cached visitors puts incoming requests into a waiting queue (HTTP 504 Gateway Timeout). Static page caching bypasses PHP workers entirely for public posts.
- Lower MySQL Query Volume: A single WordPress page load without caching triggers between 30 and 100 database queries. Serving static HTML drops database queries to zero for cached page views, freeing database resources for transactions.
How a WordPress Cache Plugin Works Under the Hood: The 4 Core Caching Types
To configure your site for maximum speed, you must understand the four distinct caching layers that operate across the network, the server and the visitor’s device. Each layer handles a specific task and an effective performance setup coordinates them in unison.
1. Page Caching (Static HTML Generation)
Page caching is the foundation of any caching plugin. When a visitor requests a blog post or landing page, WordPress queries the database for post content, theme options, navigation menus and widget settings before compiling everything into an HTML document.
The caching plugin intercepts this request. The first time a page is viewed, it captures the final HTML output and saves it as a flat .html file on the server disk (usually inside /wp-content/cache/). When subsequent visitors request that exact URL, the server delivers the pre-built HTML file directly. This bypasses the PHP interpreter and database entirely, reducing TTFB from over a second to under 100 milliseconds.
2. Browser Caching (Client-Side HTTP Directives)
While page caching lives on your web server, browser caching happens on the visitor’s computer or mobile phone. Websites contain static assets that rarely change, including logos, CSS stylesheets, JavaScript libraries and fonts.
Your caching tool configures HTTP response headers (such as Cache-Control and Expires) inside your .htaccess or Nginx configuration. These headers instruct the visitor’s browser to store static files locally for a defined period (such as one year for fonts and images). When the user clicks to a second page on your site, their browser loads those assets from local disk cache instantly without downloading them again.
3. Persistent Object Caching (Redis and Memcached)
WordPress core has a built-in object cache (WP_Object_Cache) that stores database query results in memory during a single page load. However, by default this object cache is non-persistent; it discards everything the moment the page finishes rendering.
Persistent object caching connects an in-memory data store like Redis or Memcached to your site using a drop-in script (object-cache.php). When WordPress queries the database for options, user sessions or post metadata, the result is saved in server RAM. On future page requests, WordPress fetches those queries from RAM in under 2 milliseconds rather than querying MySQL. This persistent layer is critical for logged-in user portals and WooCommerce stores where full-page HTML caching cannot be used.
4. Edge Micro-Caching and CDN Integration
Edge caching moves your static HTML pages and media files off your origin hosting server and distributes them across hundreds of global data center locations (such as Cloudflare, Fastly or Bunny CDN).
When you pair a WordPress cache plugin with an edge caching solution like Cloudflare Automatic Platform Optimization (APO) or Super Page Cache, a visitor in London or Tokyo downloads your HTML page from a server a few miles away rather than waiting for data to travel across oceans from your origin host in North America. This global distribution cuts international TTFB to sub-50ms worldwide.
Step-by-Step Tutorial: How to Set Up Any WordPress Cache Plugin
Whether you choose WP Rocket, LiteSpeed Cache, FlyingPress or Cache Enabler, the fundamental setup steps remain consistent across modern caching tools. Follow this five-step configuration sequence to set up your WordPress cache plugin for top performance:
Step 1: Enable Page Caching and Define Cache Lifespans
Open your WordPress cache plugin settings and turn on page caching. Set your cache lifespan (cache expiration) based on how frequently you publish or update content:
- Standard Blogs and Corporate Sites: Set cache lifespan between 10 hours and 24 hours. This keeps files fresh while maximizing cache hit rates.
- High-Volume News Sites: Set cache lifespan to 2 hours or 4 hours so breaking updates clear automatically.
- Mobile Caching: Enable separate mobile caching only if your theme serves different HTML or mobile-specific layouts. If your site uses modern responsive CSS, serve the same cached HTML to both desktop and mobile devices.
Step 2: Turn on Gzip or Brotli File Compression
File compression shrinks text-based files (HTML, CSS, JavaScript and XML sitemaps) before sending them over the wire to the browser. Brotli compression reduces file sizes by roughly 15% to 20% more than standard Gzip.
Most quality hosting servers have Gzip or Brotli active at the web server level. Enable the compression toggle in your WordPress cache plugin to ensure proper server rules are written to your .htaccess or server configuration. Compressing a 120KB HTML file brings it down to 25KB, speeding up download times over mobile 4G networks.
Step 3: Configure Critical CSS and JavaScript Delay for Core Web Vitals
Unoptimized CSS and JavaScript files block the browser from rendering content, leading to poor Largest Contentful Paint (LCP) and First Contentful Paint (FCP) scores. Configure your site with these performance rules:
- Minify CSS and JavaScript: Strips whitespace, comments and formatting from code files to reduce payload size.
- Generate Critical CSS: Inlines the minimal styling required to paint above-the-fold content immediately while deferring the rest of your stylesheet.
- Delay Non-Critical JavaScript: Pauses tracking scripts, live chat widgets and social embeds until the visitor scrolls or taps the screen. This single setting often boosts mobile Google PageSpeed scores by 20 to 30 points.
Step 4: Configure XML Sitemap Cache Preloading
Without cache preloading, a page is only cached after a real visitor opens it, meaning the first user suffers a slow “cache miss” page load. Preloading fixes this by automatically generating static HTML files in the background.
Point your sitemap preload feature to your XML sitemap URL (such as sitemap_index.xml from Rank Math or Yoast SEO). Whenever you publish a new post or clear your cache, the plugin crawls your sitemap and pre-builds static HTML files. Every real visitor and Googlebot crawler receives an instant “cache hit” without waiting for dynamic PHP rendering.
Step 5: Add Essential eCommerce and Dynamic URL Exclusions
Certain dynamic pages must never be cached. Serving a cached shopping cart or account dashboard causes customers to see empty carts or private order data belonging to other shoppers.
In your plugin exclusion settings, add these URL paths to the “Never Cache” list:
/cart/*/checkout/*/my-account/*- Custom login, registration or password-reset pages.
Also exclude standard eCommerce session cookies (such as woocommerce_items_in_cart and woocommerce_cart_hash) so any visitor with active items in their cart bypasses static HTML caching automatically.
How to Test and Verify That Your WordPress Cache Plugin is Working
Never assume your cache is functioning just because a plugin is activated. Always verify that your WordPress cache plugin is successfully delivering cache hits using these three verification methods:
Method 1: Inspect HTTP Response Headers in Chrome DevTools
This is the most reliable technical test. Open your browser in an Incognito or Private window so you are not logged in as an administrator:
- Right-click anywhere on the page and select Inspect, then switch to the Network tab.
- Ensure the Doc filter is selected at the top.
- Reload the webpage twice (the first load warms the cache; the second verifies the hit).
- Click on the primary document request (your page URL) and examine the Response Headers pane.
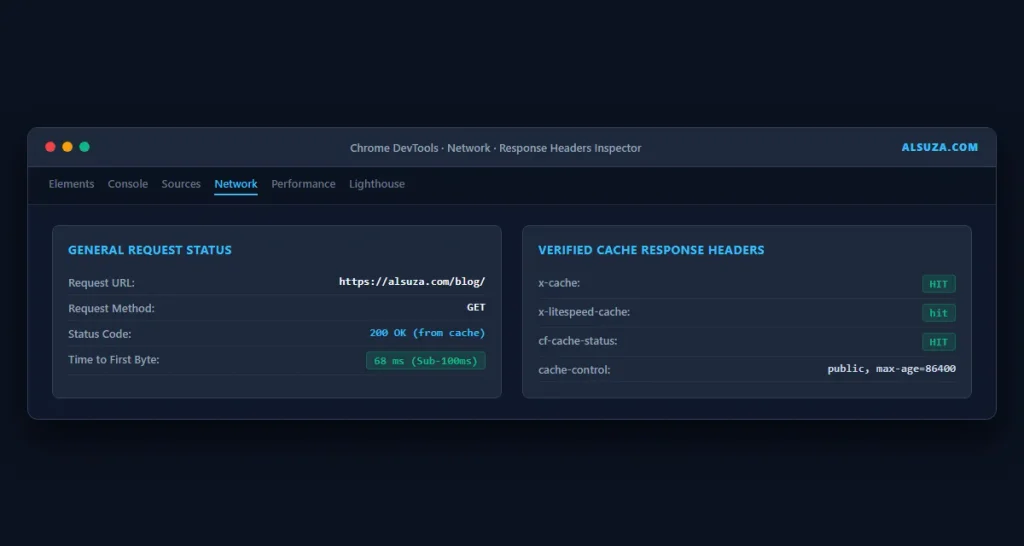
Look for verified cache status headers depending on your hosting and plugin setup:
- LiteSpeed Cache:
x-litespeed-cache: hit - Nginx FastCGI:
x-cache: HITorx-fastcgi-cache: HIT - Cloudflare Edge Cache:
cf-cache-status: HIT - Varnish:
x-varnish-cache: HIT
Method 2: Check the HTML Page Source Code Footer
Many popular caching plugins print an HTML diagnostic comment at the very bottom of your source code. Open an incognito window, right-click the page and select View Page Source. Scroll to the bottom of the HTML document:
- WP Rocket: Look for
<!-- This website is like a rocket, opens in... --> - Cache Enabler: Look for
<!-- Cache Enabler by KeyCDN: Cached file served... --> - W3 Total Cache: Look for
<!-- Performance optimized by W3 Total Cache... -->
If you see these comments in incognito mode, your caching plugin is successfully generating and serving static HTML pages.
Method 3: Run Incognito Benchmark Tests on WebPageTest
Visit WebPageTest.org, enter your URL and select a test location near your target audience. Run three consecutive test runs. If your caching tool is active, runs two and three will show a stable TTFB under 150ms and a consistent visual rendering start.
Server-Level Caching vs WordPress Cache Plugin: What is the Difference?
One of the most common questions website owners ask is whether they need a WordPress cache plugin if their web host already provides server-level caching like Nginx FastCGI, LiteSpeed or Varnish. Here is how the two approaches compare across core capabilities:
| Capability | Server-Level Caching (Nginx / LiteSpeed / Varnish) | Plugin-Level Caching (WP Rocket / FlyingPress) | The Hybrid Strategy (Recommended) |
|---|---|---|---|
| Execution Point | Web server RAM or disk before PHP starts. | PHP application layer inside WordPress. | Server handles HTML page caching; plugin optimizes frontend assets. |
| Response Time (TTFB) | Sub-70ms (typically 20ms to 70ms). | Fast (typically 80ms to 180ms). | Sub-50ms TTFB worldwide. |
| Setup Complexity | Requires server root access or specific host integration. | One-click install from the WordPress dashboard. | Host enables server cache; plugin manages asset delays and cache purging. |
| CSS & JS Optimization | None. Delivers assets as-is without delay or minification. | Advanced. Handles Critical CSS, script delaying and font optimization. | Full Core Web Vitals optimization with zero manual coding. |
| Cache Invalidation | Purges on post update via webhooks or companion helper plugin. | Automatic purge when posts, comments or categories change. | Companion plugin tells the server cache to clear immediately on edit. |
The ideal architecture is a hybrid setup. Let your web server (LiteSpeed or Nginx) handle raw static HTML page caching for sub-50ms TTFB. Then use a lightweight WordPress cache plugin to handle asset optimization, JavaScript delay, Critical CSS generation and automated server cache clearing.
Troubleshooting: How to Fix Common WordPress Cache Plugin Issues
Even with careful configuration, caching can occasionally cause unexpected display glitches. Here is how to diagnose and resolve the four most frequent WordPress cache plugin problems:
Problem 1: Changes to Content or Layouts Are Not Appearing
You published an edit or updated a theme style but your browser continues showing the old version. This happens because your server, your CDN and your local browser are all holding separate cached snapshots. To resolve this, clear your cache in three sequential steps: first purge your WordPress cache plugin from the top admin bar, then purge your CDN edge cache (such as Cloudflare) and finally hard-refresh your browser (Ctrl+Shift+R or Cmd+Shift+R).
Problem 2: WooCommerce Cart or Checkout Displays Another Customer’s Info
This is a severe security issue caused by aggressive full-page caching. It occurs when dynamic checkout URLs are saved into static HTML files. Immediately add /cart/*, /checkout/* and /my-account/* to your WordPress cache plugin exclusion list. In addition, configure your cache to bypass static HTML delivery whenever the woocommerce_items_in_cart cookie is present.
Problem 3: Interactive Contact Forms or Lead Popups Stop Working
Forms and popups rely on security tokens called nonces. WordPress nonces expire after 12 to 24 hours. If your WordPress cache plugin serves a static HTML page cached for 48 hours, the form nonce will be invalid and submissions will fail with a “Session Expired” error. To fix this, shorten your cache expiration to 10 hours or enable AJAX nonce refreshing in your form plugin settings.
Problem 4: Sitemap Cache Preloading Causes High Server CPU Spikes
Aggressive preloading crawlers that request 100 pages per minute can overload modest shared hosting accounts. If your CPU shoots to 100% after clearing cache, adjust your WordPress cache plugin settings to crawl fewer pages per minute or switch to link prefetching on hover, which pre-caches only the specific links a visitor moves their mouse toward.
How to Choose the Best WordPress Cache Plugin for Your Website
Selecting the right caching plugin depends directly on your server environment, technical comfort and budget:
- LiteSpeed Server Hosting: Use LiteSpeed Cache (LSCache). It communicates directly with the LiteSpeed web server engine at the root level, making it the fastest free caching solution available on LiteSpeed or OpenLiteSpeed hosting.
- Nginx or Apache Cloud VPS: Use WP Rocket or FlyingPress. Both plugins deliver world-class Core Web Vitals optimization, automated Critical CSS generation and reliable JavaScript delay with zero coding required.
- Budget-Conscious Sites: Use Cache Enabler paired with Autoptimize. This free open-source combination provides clean static HTML page caching without adding bloat to your WordPress dashboard.
For a detailed breakdown of features, benchmarks and pricing, explore our complete comparison of the 7 Best WordPress Cache Plugins in 2026.
Frequently Asked Questions (FAQ)
Here are direct answers to common questions site owners ask when configuring a WordPress cache plugin:
What does a WordPress cache plugin do?
A WordPress cache plugin saves pre-built static HTML copies of your dynamic pages on the server. When someone visits your site, the plugin serves the static HTML file immediately instead of running PHP scripts and executing database queries on every page view.
Is a free WordPress cache plugin good enough for most websites?
Yes. Free plugins like LiteSpeed Cache, Cache Enabler and WP Super Cache provide excellent page caching. However, premium options like WP Rocket and FlyingPress include automated Critical CSS generation and JavaScript delay settings that make passing Google Core Web Vitals significantly easier.
Can a WordPress cache plugin slow down my website if configured incorrectly?
Yes. Running two caching plugins at the same time causes software conflicts. Similarly, aggressive preloading schedules on low-tier hosting or combining massive JavaScript files can cause high CPU usage and broken layouts. Only run one WordPress cache plugin at a time.
How does a WordPress cache plugin improve my Google search rankings?
Google considers page speed and Core Web Vitals (LCP, INP and CLS) official search ranking signals. By dropping your TTFB under 200ms and removing render-blocking assets, a WordPress cache plugin helps your site qualify for higher search visibility and better crawl efficiency.
What is the difference between clearing cache and purging cache?
In most caching tools, clearing and purging refer to the same action: deleting stored static HTML files so fresh versions can be generated. However, “soft purge” invalidates files so the server updates them on the next visit, while “hard purge” deletes files from storage immediately.
Do I need a WordPress cache plugin if I use Cloudflare?
Yes. By default, free Cloudflare plans cache static assets (images, CSS and JavaScript) across its global edge network but do not cache dynamic WordPress HTML pages. You still need a WordPress cache plugin to generate static HTML on your origin server unless you activate Cloudflare APO or configure custom Cache Everything page rules.
Will a WordPress cache plugin break my website analytics tracking?
No. Standard analytics tools like Google Analytics 4, Plausible and Meta Pixel run client-side JavaScript in the visitor’s browser. Because they execute after the page loads, static HTML caching does not interfere with pageview tracking or conversion events.
How do I exclude specific pages from being cached?
Every quality WordPress cache plugin provides an exclusion box in its settings. Open your plugin settings, find the Never Cache URLs or Advanced Rules tab and enter the relative URL paths you wish to exclude (such as /cart/ or /checkout/). Save your settings and purge existing cache files.
Conclusion: Mastering Your WordPress Cache Plugin Strategy
Configuring an effective WordPress cache plugin is one of the highest-ROI improvements you can make for your site. By transforming slow, repetitive PHP execution into fast static HTML delivery, you cut bounce rates, improve user experience and give your site the speed foundation needed to rank higher on Google.
Your 3-Step Cache Optimization Game Plan
- Select a caching solution suited to your server environment: LiteSpeed Cache for LiteSpeed hosting or WP Rocket / FlyingPress for Nginx and Apache cloud servers.
- Enable page caching, configure Gzip/Brotli compression and add critical eCommerce URL exclusions for
/cart/and/checkout/. - Verify your setup in Chrome DevTools using an incognito window to confirm that incoming requests return a verified
x-cache: HITorx-litespeed-cache: hitresponse header.
Recommended Next Steps for Your Site Architecture
- Compare top caching tools in our roundup of the 7 Best WordPress Cache Plugins in 2026.
- Build dependable recurring monthly revenue by following our step-by-step tutorial on How to Create a Subscription Website with WordPress.
- Keep your high-speed site safe from malware injections by exploring our WordPress Malware Protection Guide.