

Every single-purchase store faces the same frustrating math on the first day of the month: the revenue counter drops back to zero. Even after a record sales week, you are right back on the acquisition treadmill paying for ads and hunting for new buyers just to match last month’s numbers.
That monthly reset is the exact reason I encourage founders and creators to create a subscription website instead of relying only on one-off checkouts. Predictable monthly recurring revenue (MRR) changes how you run a business. You know your baseline cash flow before the month starts, you build direct relationships with returning members and each customer is worth several times more over a year than a single-order buyer.
Most people assume they have to rent an expensive SaaS platform like Shopify, Subbly or Kajabi or pay $279 per year for bloated enterprise extensions just to bill cards automatically. After setting up dozens of WooCommerce stores, I built a cleaner stack. By pairing WordPress, WooCommerce and ArraySubs, you can create a subscription website that you own outright. There are no platform revenue cuts or surprise per-subscriber fees and your customer records stay on your own server.
In this step-by-step guide, I will show you how to create a subscription website from a blank WordPress install in 2026. You will see every setting inside the real dashboard, from configuring tokenized Stripe renewals to preventing the caching mistakes that break member checkouts.
What Is a Subscription Website and How Does Recurring Billing Work?
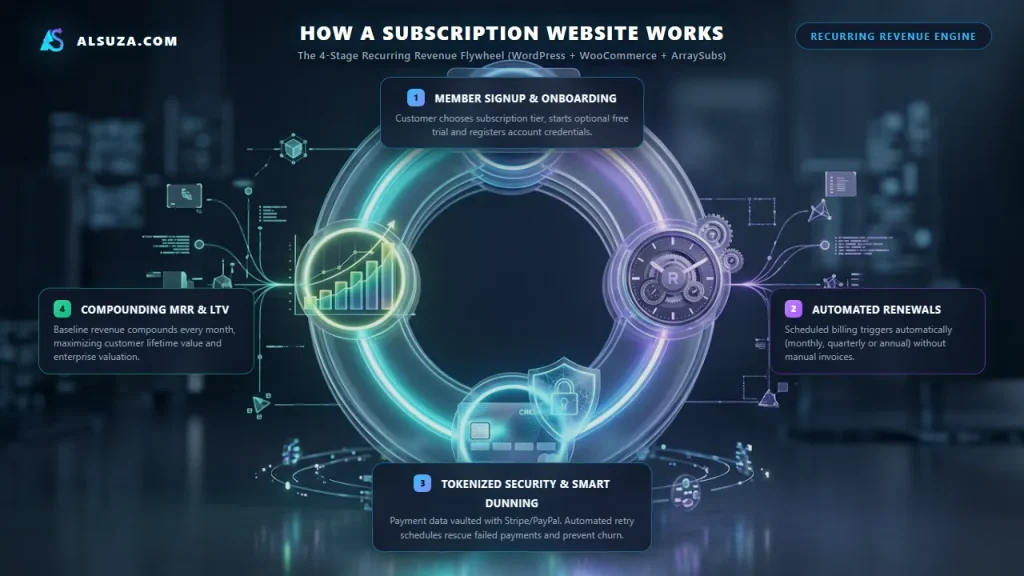
A subscription website is an online store or membership portal that bills customers on a repeating schedule (weekly, monthly, quarterly or yearly) in exchange for ongoing access to physical products, digital files, software licenses or private community spaces.
In a standard eCommerce shop, the relationship between your checkout software and the buyer ends the second the receipt email lands in their inbox. A recurring store works differently. The moment you create a subscription website, your checkout vaults a secure payment token with Stripe or PayPal, runs scheduled renewal charges in the background, unlocks or revokes member permissions automatically and gives customers a self-serve portal to swap cards or pause deliveries without emailing support.
Five Proven Models to Create a Subscription Website Around
Before touching plugins or payment gateways, it helps to pick a clear billing structure. Most profitable businesses that create a subscription website fall into one of these five revenue models:
- Curated Physical Subscription Boxes: Ship monthly packages of roasted coffee beans, specialty snacks, apparel or hobby supplies on a fixed renewal date.
- Gated Digital Libraries and Courses: Lock premium tutorials, industry research briefs, design templates or video lessons behind an active monthly or annual pass.
- Productized Agency and Freelance Retainers: Put WordPress maintenance plans, SEO retainers, bookkeeping or design hours on automated monthly card billing instead of chasing manual invoices.
- Software and Plugin Licensing: Sell annual or monthly access to software downloads, license keys and ongoing version updates.
- Private Communities and Masterminds: Charge recurring dues for access to member forums, private Slack or Discord groups and live monthly Q&A sessions.
Essential Prerequisites: The 4-Part Stack You Need Before You Start
Recurring stores work much harder behind the scenes than static blogs. Every time a membership renews at 3:00 AM, your server has to process webhook callbacks from Stripe, verify payment tokens, generate a new WooCommerce renewal order and send receipt emails. Trying to create a subscription website on cheap $2 shared hosting leads to slow database queries that time out during checkout.
Here is the exact four-part technical stack I use to create a subscription website that handles automated renewals without hiccups:
| Stack Component | Why Recurring Stores Need It | Recommended Setup & Typical Cost |
|---|---|---|
| 1. Custom Domain Name | Builds buyer trust at checkout and protects your sender reputation for billing and renewal emails. | A clean .com domain via Cloudflare Registrar, Namecheap or Porkbun ($10 to $14/year). |
| 2. Cloud WordPress Hosting | Handles un-cacheable logged-in sessions, Stripe/PayPal webhooks and background renewal cron jobs. | LiteSpeed or Nginx cloud server with 2GB+ RAM and NVMe storage via Cloudways, Hostinger Business or Kinsta ($12 to $35/month). |
| 3. WordPress.org Core | Gives you 100% ownership of your customer database when you decide to create a subscription website without platform fee hikes. | Free open-source software (1-click install included with your host). |
| 4. WooCommerce + ArraySubs | Pairs WooCommerce’s cart and tax engine with native recurring billing intervals, free trials and dunning recovery. | Free WooCommerce core plugin paired with the ArraySubs recurring billing engine. |
How to Create a Subscription Website with WordPress (Step-by-Step)
Once your hosting account is ready, you can build the entire recurring checkout flow in under an hour. Follow these nine steps to create a subscription website with WordPress, WooCommerce and ArraySubs.
Step 1: Register a Clean Domain Name
Your domain name is the permanent address for your business and the sender address for every renewal receipt. Pick a short, memorable name that fits your niche before you create a subscription website and stick to a standard .com extension if it is available.
Skip hyphens, numbers and clever misspellings that force customers to guess how to type your URL. I register all of my domains through Cloudflare Registrar, Namecheap or Porkbun because they include free WHOIS privacy and transparent renewal pricing between $10 and $14 per year.
Step 2: Provision Fast Cloud WordPress Hosting
Server speed matters far more for store owners who create a subscription website than for bloggers running static pages. Logged-in subscribers browsing your store bypass full-page HTML cache, which means every click hits PHP workers and your MySQL database directly.
Choose a cloud host running LiteSpeed or Nginx with at least 2GB of dedicated RAM, NVMe SSD storage and free Let’s Encrypt SSL certificates. Cloudways, Hostinger Business and Kinsta are all solid choices here. Never accept credit card details or login passwords without an active HTTPS padlock on your domain.
Step 3: Install WordPress and Fix Two Core Settings First
After running your host’s 1-click WordPress installer, log into your admin area at yourdomain.com/wp-admin. Before you install any eCommerce plugins to create a subscription website, fix two default WordPress settings that often trip up store owners:
- Switch Permalinks to Post Name: Open Dashboard -> Settings -> Permalinks and select Post name (
/%postname%/). Clean URLs prevent 404 errors on custom WooCommerce account endpoints like/my-account/subscriptions/. - Match Your Exact City Timezone: Go to Dashboard -> Settings -> General and set your local city timezone. If you leave WordPress on the default UTC+0 offset, scheduled trial expirations and renewal charges will fire hours earlier or later than your customers expect.
Step 4: Install and Activate the Astra Theme
Heavy multipurpose themes packed with sliders and unused JavaScript slow down mobile checkouts. Anyone planning to create a subscription website should use a lean storefront theme that keeps the checkout form fast and distraction-free.
I use the free Astra theme for WooCommerce subscription builds:
- In your WordPress sidebar, open Appearance -> Themes and click Add New Theme.
- Type Astra into the search box, click Install and click Activate.
- Astra loads under 50KB on the front end and includes clean native styling for WooCommerce product pages, carts and account tabs out of the box.
Step 5: Install and Configure WooCommerce
WooCommerce is the transaction engine that manages your product catalog, tax rules, checkout fields and customer accounts whenever you create a subscription website on WordPress.
- Go to Dashboard -> Plugins -> Add New Plugin.
- Search for WooCommerce in the plugin directory.
- Click Install Now and then Activate.
- Walk through the short setup wizard to enter your store location and base currency (such as USD
$). WooCommerce will automatically create your required Shop, Cart, Checkout and My Account pages.
Step 6: Upload and Activate the ArraySubs Plugin
Standard WooCommerce only supports one-time checkouts. To create a subscription website on WooCommerce without paying hundreds of dollars every year in plugin renewals, install ArraySubs. It adds billing intervals, free trials, sign-up fees and automated dunning directly into your existing WooCommerce product editor.
- In your WordPress admin menu, go to Plugins -> Add New Plugin and click the Upload Plugin button at the top of the page.
- Click Choose File, select your downloaded
arraysubs.zipfile and click Install Now.
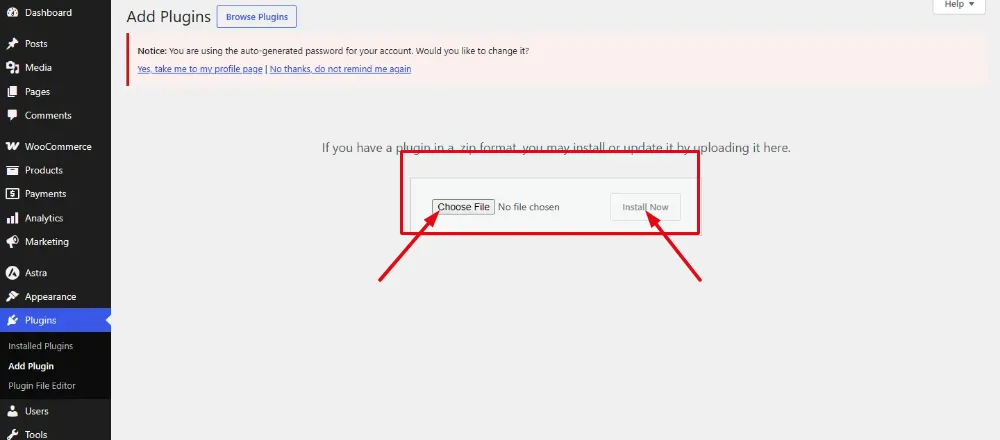
- Once WordPress unpacks the zip archive, click the blue Activate Plugin button.
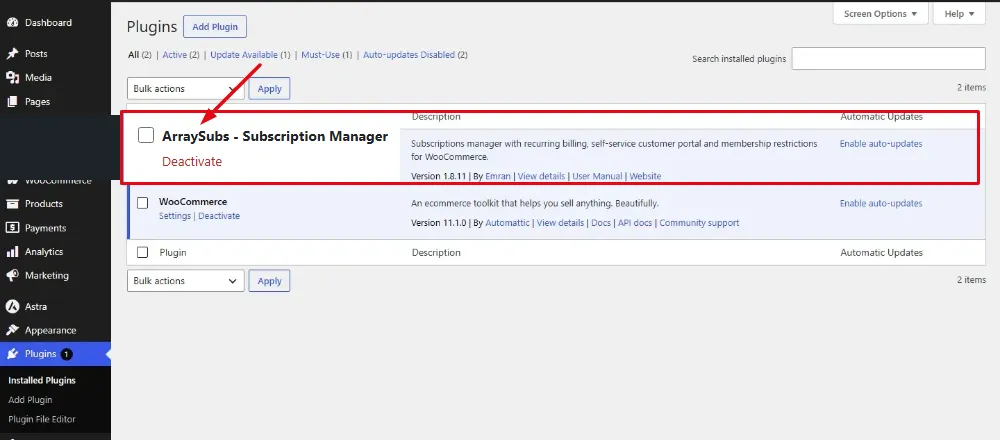
- Check Plugins -> Installed Plugins to confirm that ArraySubs is active alongside WooCommerce.
Step 7: Tour the ArraySubs Dashboard and Onboarding Checklist
Once you activate ArraySubs to create a subscription website, it adds a dedicated top-level ArraySubs menu inside your WordPress sidebar. Click ArraySubs -> Subscriptions to open your recurring revenue command center.
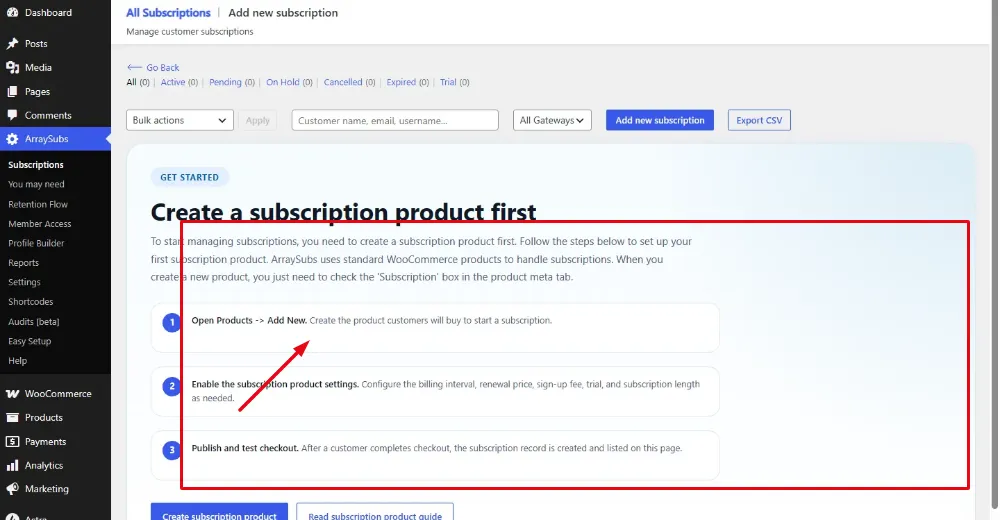
Instead of digging through generic WooCommerce orders to figure out who is still paying, this screen separates your recurring metrics into three practical views:
- Live summary counters at the top show your exact count of active subscribers, pending checkouts, paused plans, cancelled accounts and members currently in a free trial window.
- Quick-filter status tabs let you isolate past-due or on-hold accounts in one click whenever a customer asks for billing help.
- A built-in 3-step onboarding checklist walks you through connecting your payment gateway, verifying your renewal settings and publishing your first plan.
Step 8: Connect a Tokenized Payment Gateway (Stripe or PayPal)
To bill customers automatically every month after you create a subscription website, you need a gateway that supports card tokenization. With tokenization, your WordPress database never touches or stores raw credit card numbers. Stripe or PayPal vaults the card on their PCI-compliant servers and hands your store an encrypted token that ArraySubs charges on each renewal date.
- Open WooCommerce -> Settings and click the Payments tab.
- For live stores, enable the official WooCommerce Stripe Gateway or PayPal Payments so buyers can subscribe with credit cards, debit cards, Apple Pay or Google Pay.
- If you are building on a local staging site first, you can toggle on Cash on delivery or Direct bank transfer to test the full checkout and renewal order flow before switching to live API keys.
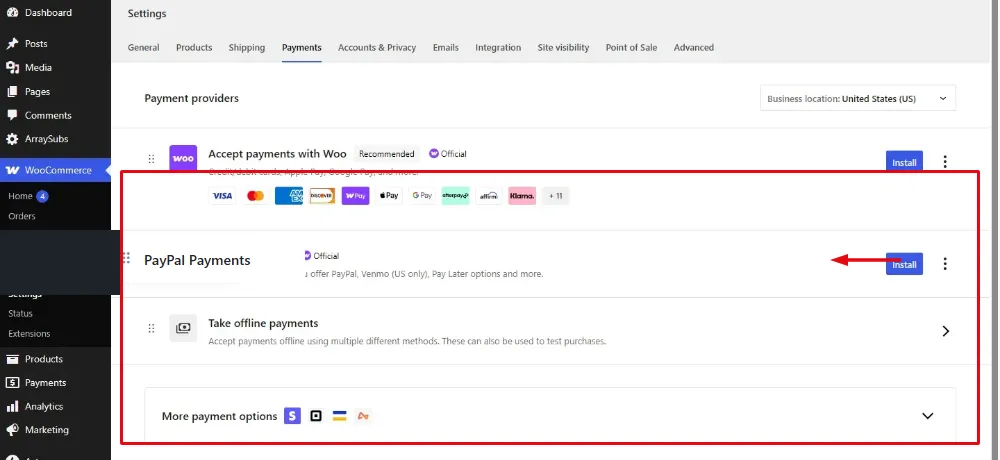
Double-check that your Stripe or PayPal webhook URL is registered and active inside your payment processor’s dashboard. Webhooks are how your store learns whether an automatic renewal succeeded or failed in the middle of the night.
Step 9: Publish Your First Subscription Product
Now that your gateway is ready, you can set up your first recurring offer. This is the final configuration step required to create a subscription website product inside WooCommerce:
- Go to Products -> Add New in your WordPress sidebar.
- Give your plan a clear title (such as VIP Monthly Apparel Club) and write out exactly what members receive each billing cycle, including delivery schedules and member perks.
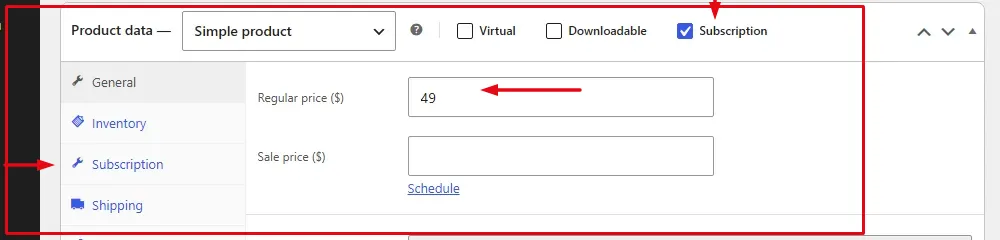
- Scroll down to the Product data box below the main editor:
- Leave the product type dropdown on Simple product.
- Tick the Subscription checkbox added by ArraySubs.
- Set your recurring price in the Regular price ($) field (for example,
$49.00). - Open the Subscription tab on the left side of the panel to pick your billing interval (such as every
1 month), add an optional free trial (such as14 days) or set a one-time onboarding fee.
- Upload a clean product image in the right sidebar and click Publish.
View from the Front End: What Your Subscribers See at Checkout
Always open an incognito browser window after publishing a plan so you can test the buyer journey yourself. Whenever you create a subscription website, transparent billing terms on the product page are what convince a hesitant visitor to commit to recurring charges.
Here is how ArraySubs transforms the standard WooCommerce product template on the front end:
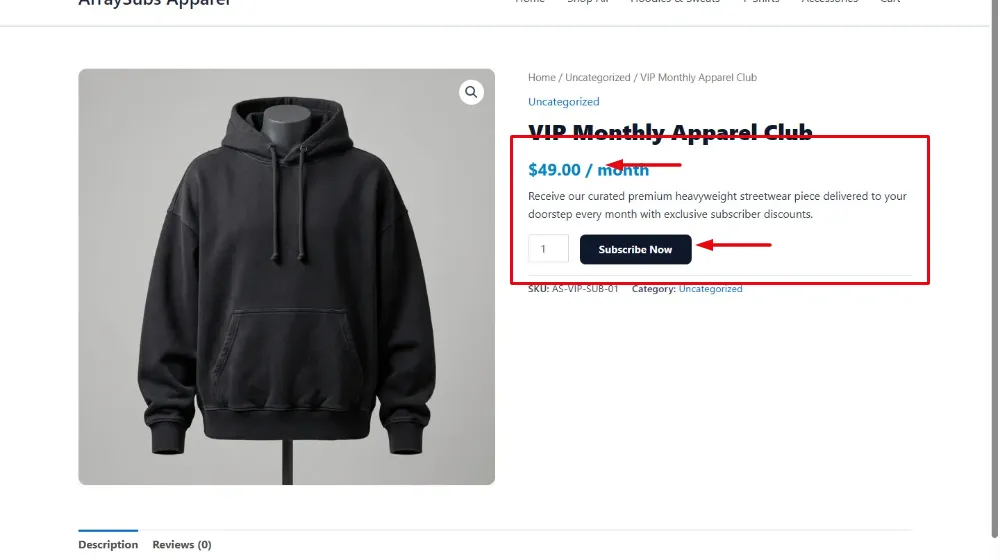
- Instead of a flat price tag, the price header automatically displays the exact billing cadence (
$49.00 / month) along with any free trial terms or sign-up fees before the buyer clicks. - The generic “Add to cart” button is replaced by a direct Subscribe Now call-to-action so the buyer knows they are starting a recurring membership.
- Variant selectors, delivery promises and bulleted member perks sit right above the fold to answer common pre-purchase objections.
Once a buyer clicks Subscribe Now and completes checkout, WooCommerce creates their member profile, captures the tokenized payment method and unlocks their account immediately.
Managing Subscriptions: Self-Serve Portals and Failed Payment Recovery
Getting the first checkout is only half the job. After you create a subscription website, your day-to-day profitability depends on two operational systems: letting members manage their own plans without opening support tickets and recovering failed card renewals automatically.
1. The Subscriber Self-Serve Account Portal
Nothing frustrates subscribers faster than having to email support just to swap an expired Visa card or update a street address. Every customer who signs up after you create a subscription website gets a dedicated Subscriptions tab inside their /my-account/ dashboard:
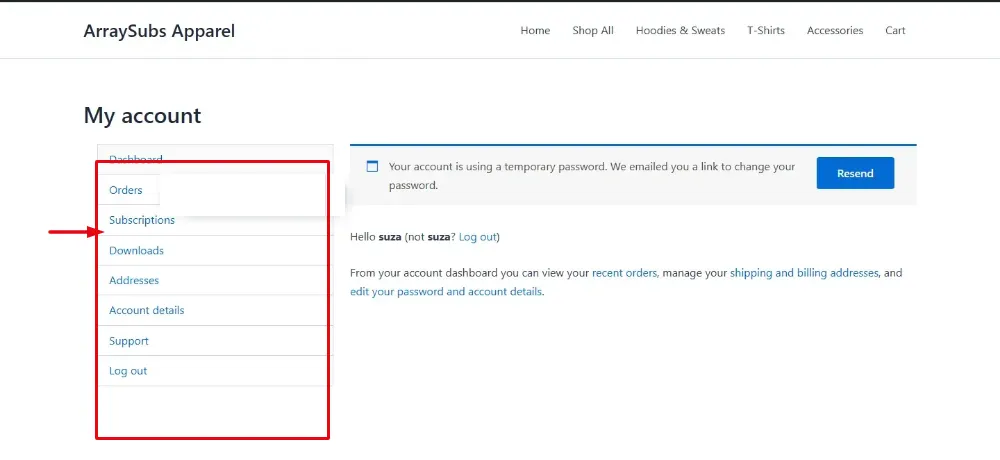
Inside this self-serve view, members can handle four common tasks on their own:
- Check their exact next billing date and renewal amount.
- Swap out an expired credit card or change their delivery address before the next box ships.
- Pause their plan while traveling or upgrade to a higher membership tier without waiting on a support agent.
- Cancel their membership in two clicks through transparent self-guided controls.
2. Automated Dunning for Expired Cards and Failed Renewals
In almost every recurring store I audit, 20% to 30% of churn has nothing to do with unhappy customers. It is involuntary churn caused by expired credit cards, bank fraud filters or temporary spending limits.
If your store cancels a member the second a $49 charge declines, you lose revenue you already earned. Stores that create a subscription website with ArraySubs use built-in dunning to recover failed charges automatically:
- A declined renewal places the account into a temporary grace period instead of cutting off member access right away.
- Scheduled background retries attempt the card charge again over the next several days.
- Automated dunning emails send the customer a direct link to update their payment method inside
/my-account/so the membership stays active.
Four Retention Tactics When You Create a Subscription Website
Acquiring a new subscriber takes work, so keeping them past month three is where your real profit margin lives. As soon as you create a subscription website and start welcoming members, put these four retention habits in place.
1. Pitch an Annual Plan with Two Months Free
Monthly billing lowers the barrier to entry, while annual billing eliminates twelve separate opportunities for a customer to cancel. Offer a clear yearly plan priced at ten times your monthly rate (giving the buyer two months free). Even if only 20% of buyers pick the annual option, that upfront cash pays for your initial traffic and server costs right away.
2. Always Offer a 30-Day Pause Button Next to Cancel
Customers with physical subscription boxes often cancel simply because they have a backlog of unopened coffee or supplements in their pantry. Give subscribers a one-click option to pause billing for 30 or 60 days inside their account dashboard. A paused member resumes paying next month, whereas a cancelled member rarely returns.
3. Surprise Members at the Month-Three Drop-Off Point
Most consumer subscription stores see their steepest cancellation spike between day 60 and day 90. Beat that drop-off by scheduling an unexpected bonus in month three: a downloadable cheat sheet, a free sample item in their physical box or a permanent 15% storewide coupon for being an early member.
4. Watch Second-Month Cohort Churn Like a Hawk
Do not just track total subscriber growth. Check how many buyers survive from their first charge to their second renewal. If a high share of buyers cancel before month two after you create a subscription website, your welcome email sequence is not showing them how to get quick value from their membership in the first 48 hours.
Critical Performance and Caching Rules for Subscription Websites
Speeding up a recurring WooCommerce store is very different from caching a regular blog. Misconfiguring full-page caching after you create a subscription website can cause one customer to see another subscriber’s billing address or a cached empty cart.
Never Full-Page Cache Cart, Checkout or My Account URLs
Confirm that your caching plugin and Cloudflare page rules explicitly exclude /cart/, /checkout/ and /my-account/* from HTML page caching. Those URLs render live session data and payment tokens that must be generated fresh for every single visitor.
Bypass HTML Cache Whenever WooCommerce Login Cookies Exist
Configure your cache layer to bypass static HTML delivery as soon as a browser carries standard WordPress login cookies or woocommerce_items_in_cart session cookies. That way, logged-in subscribers always see their live membership tier and accurate renewal dates.
Use Redis Object Caching for Database-Heavy Renewal Windows
Because logged-in members bypass HTML page cache, your database does the heavy lifting. Turn on Redis or Memcached object caching inside your hosting panel to create a subscription website architecture where repeated WooCommerce option lookups and session queries stay in fast server memory.
If you want the exact exclusion rules and Redis settings I use in production, read my step-by-step WordPress Cache Plugin Complete Guide.
The Unit Economics: Why Creating a Subscription Website Beats One-Off Retail
If you are still deciding whether to sell products once or bill on a schedule, look at the unit economics. Founders who create a subscription website gain three financial levers that one-time stores never have.
1. Compounding Monthly Baseline Revenue
In a traditional online shop, paying for 100 orders in January gives you zero guaranteed orders in February. Once you create a subscription website, the 100 members you acquire in January form your starting baseline for February. Every new subscriber you add in February stacks on top of January’s cohort instead of merely replacing yesterday’s buyers.
2. 8x Higher Customer Lifetime Value on the Same Ad Spend
Paid traffic gets more expensive every year, which makes single-item margins razor-thin. Suppose it costs you $25 in ads to acquire a buyer. If that buyer spends $50 on a one-time shirt order, you barely break even after fulfillment. If that same buyer joins a $35 monthly apparel box on your store and stays for twelve months, they generate $420 in gross revenue from that exact same $25 acquisition cost.
3. Higher Exit Valuation Multiples
Should you ever decide to sell your online business on a marketplace like Flippa or Acquire.com, buyers pay a steep premium for contracted recurring cash flow. Operators who create a subscription website with documented monthly recurring revenue and low churn routinely sell for 3x to 5x higher multiples than one-off eCommerce shops with the same annual profit.
Frequently Asked Questions (FAQ)
Here are straightforward answers to the questions store owners ask me most often before they create a subscription website on WordPress:
Can I offer free trials on my subscription plans?
Yes. ArraySubs lets you add a custom free trial period (such as 7 days, 14 days or 30 days) to any subscription product. The buyer enters their card details at checkout for $0.00 today and Stripe or PayPal automatically bills the first recurring charge the moment the trial window expires.
Do I have to pay monthly platform fees like Shopify or Subbly?
No. Hosted subscription platforms charge a monthly software fee plus an extra transaction cut on every renewal. If you create a subscription website with WordPress, WooCommerce and ArraySubs, you keep 100% of your revenue and only pay standard Stripe or PayPal card processing fees (typically 2.9% + $0.30 per charge).
Can subscribers upgrade or downgrade their membership plans?
Yes. Customers can switch between membership tiers directly inside their /my-account/ portal. You can choose whether to prorate the price difference immediately or apply the new tier price on their next scheduled billing date.
What happens if a subscriber decides to cancel?
Members can cancel anytime from their self-serve account tab. Store owners who create a subscription website with ArraySubs can choose whether cancellation revokes access immediately or lets the member keep their benefits until the end of the billing cycle they already paid for.
Can I sell both one-time products and recurring subscriptions on the same site?
Yes. Because ArraySubs runs natively inside WooCommerce, shoppers can buy standard one-off physical items, digital downloads and recurring subscription plans inside the exact same cart and checkout.
Wrapping Up: Launch Your WordPress Subscription Website Today
Learning how to create a subscription website on your own WordPress stack is one of the smartest financial moves you can make as an online business owner. Instead of renting your business from a closed SaaS platform or starting every month at zero revenue, you own the code, the checkout and the customer list outright.
If you are ready to create a subscription website today, run through this final four-step preflight check:
- Register your
.comdomain and spin up a 2GB+ LiteSpeed or Nginx cloud server with HTTPS enabled. - Install WordPress, set your local timezone, activate the Astra theme and run the WooCommerce setup wizard.
- Upload ArraySubs, connect tokenized Stripe or PayPal payments and verify that your webhook endpoint is active.
- Publish your first recurring product, test the
/my-account/portal in an incognito window and invite your first founding members.
Recommended Next Guides for Your Store Architecture
- Speed up your logged-in checkout flow with my benchmark comparison of the 7 Best WordPress Cache Plugins in 2026.
- Lock down your customer database and payment endpoints using my WordPress Malware Protection Guide.
- Stop non-members from sharing direct download links with my WordPress File Protection Buyer’s Guide.